Hello, I am a maker of a wide variety of genres. I have worked as a Architectural model maker, designer, tool maker and graphic designer.

To view my online Photo Portfolio of my Architectural model making please go here.

This blog is where I document my personal and commission projects with photos and write ups.

Please read my about me page for contact info and how to enquire about commissions or plan purchases.

Plans for sale : here

20 July 2023

Simple Classic Car Wooden Toys.

My son was gifted some simple wooden car toys. 
He absolutely loved them, so i wanted to make him some more. 

 https://content.instructables.com/ORIG/FWC/92BX/KOZRGR4N/FWC92BXKOZRGR4N.jpg?auto=webp&frame=1&width=1024&height=1024&fit=bounds&md=2824024b68fc43aca3750d26a19ce222

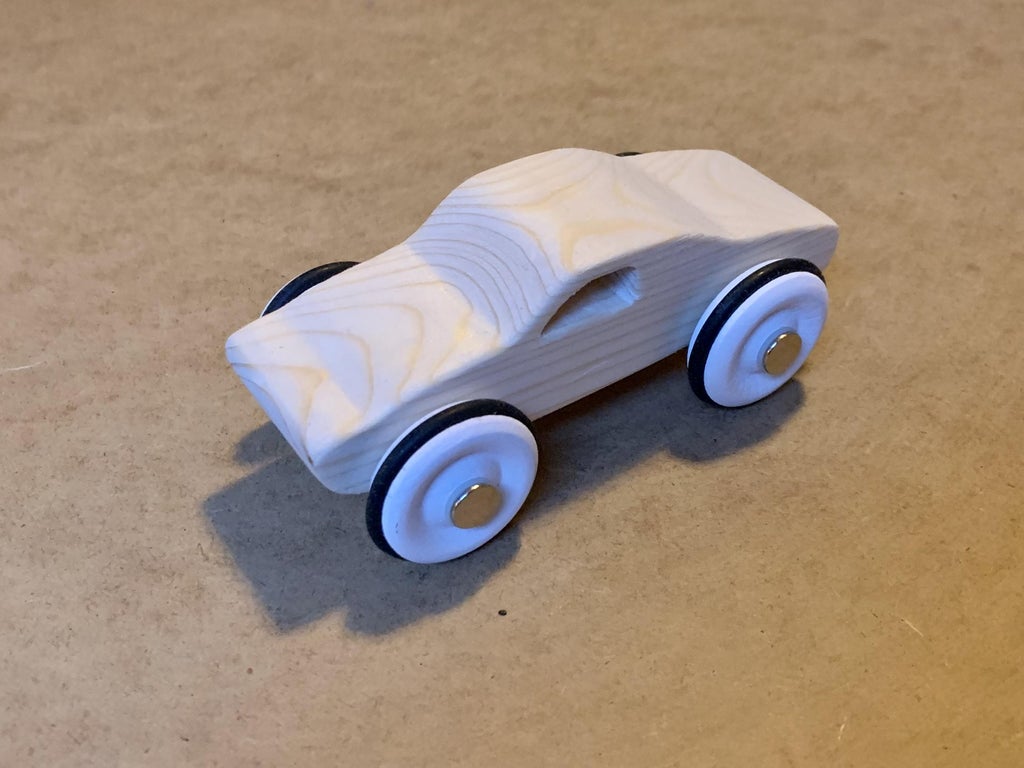
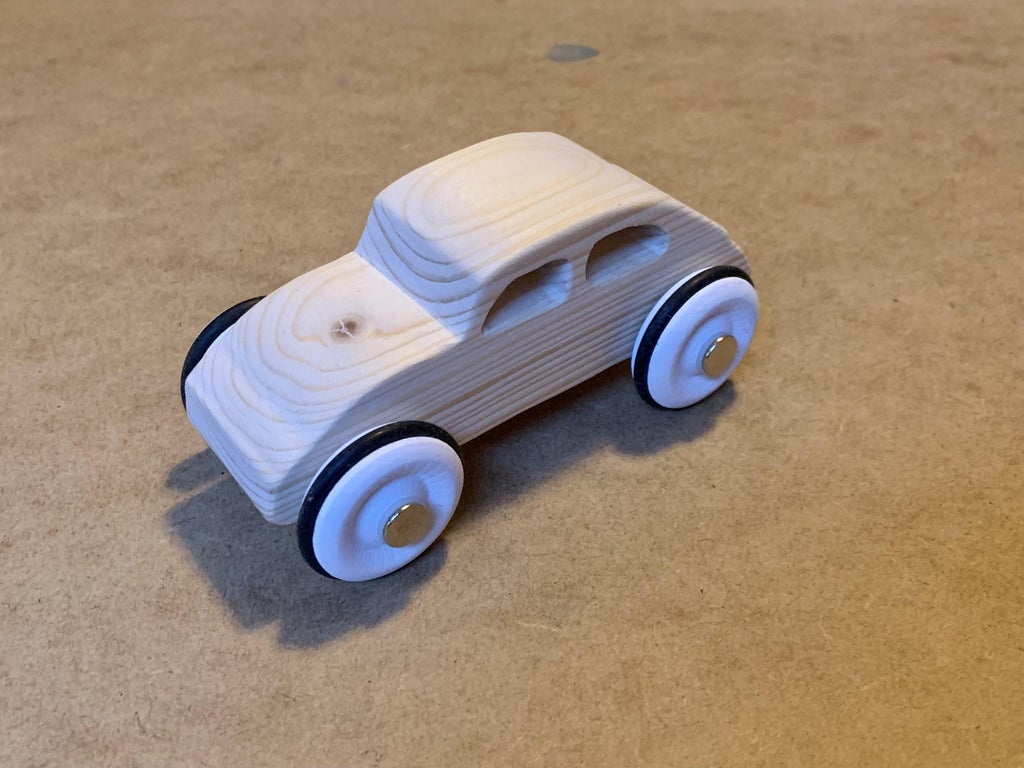
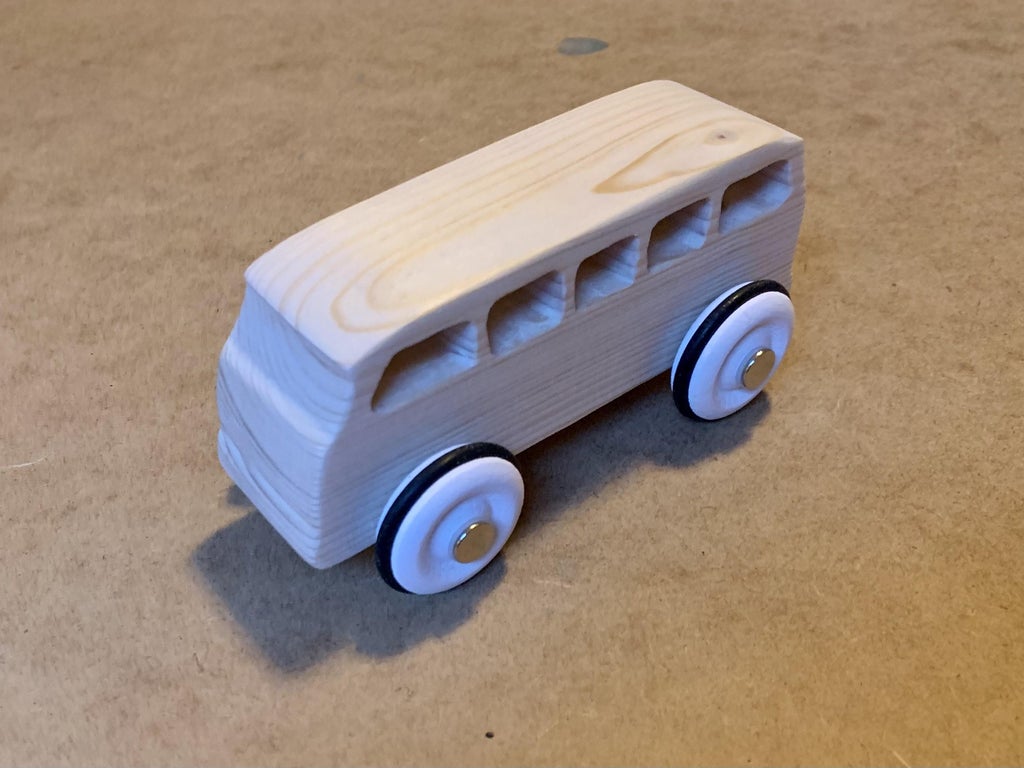
I really like some of the classic VW cars, so that's the style i decided to make. 

https://content.instructables.com/ORIG/FUL/H3K8/KOU1PNNW/FULH3K8KOU1PNNW.jpg?auto=webp&frame=1&width=1024&height=1024&fit=bounds&md=fc8470af09acd0f4677574e8c4b58bac https://content.instructables.com/ORIG/F5O/D9I8/KOU1PNQA/F5OD9I8KOU1PNQA.jpg?auto=webp&frame=1&width=1024&height=1024&fit=bounds&md=b0d0106a7593844429c9687c281091f8

https://content.instructables.com/ORIG/F42/88GJ/KOU1PNLI/F4288GJKOU1PNLI.jpg?auto=webp&frame=1&width=1024&height=1024&fit=bounds&md=efefac124aaeeaf068d7366ea43a0a12 https://content.instructables.com/ORIG/FUY/3KAH/KOU1PNJ5/FUY3KAHKOU1PNJ5.jpg?auto=webp&frame=1&width=1024&height=1024&fit=bounds&md=3a3000df0ab584e5da1b7c9c1574ee32


The first step was to get side views of all the car I wanted to make. 

  https://content.instructables.com/ORIG/FB8/05FN/KQ57AAUD/FB805FNKQ57AAUD.jpg?auto=webp&frame=1&width=1024&height=1024&fit=bounds&md=cd874a220633db60c3ebe3003e32cba4  https://content.instructables.com/ORIG/F60/PQ6L/KQ57A9NT/F60PQ6LKQ57A9NT.bmp?auto=webp&frame=1&width=1024&height=1024&fit=bounds&md=c6524d6c239b333fc7677f706febdb68

 I found some side shots on google and took them into a CAD program to trace round them and create the templates for cutting. Any photo editing software will work, as long as you can scale the image and draw round it. 


I printed the templates out at the correct size and glued them onto the wood.  

I used 38mm x 63mm pine


Using a scroll saw I cut round the outside of the templates. 
 https://content.instructables.com/ORIG/F92/OO3U/KOH6S1IM/F92OO3UKOH6S1IM.jpg?auto=webp&frame=1&width=1024&height=1024&fit=bounds&md=0c2cf3e396fdf95c054a2c9d9a6030ec https://content.instructables.com/ORIG/F0A/A5NI/KOH6S3W9/F0AA5NIKOH6S3W9.jpg?auto=webp&frame=1&width=1024&height=1024&fit=bounds&md=bfbc2b71698416040b3500d12eb6b9fc

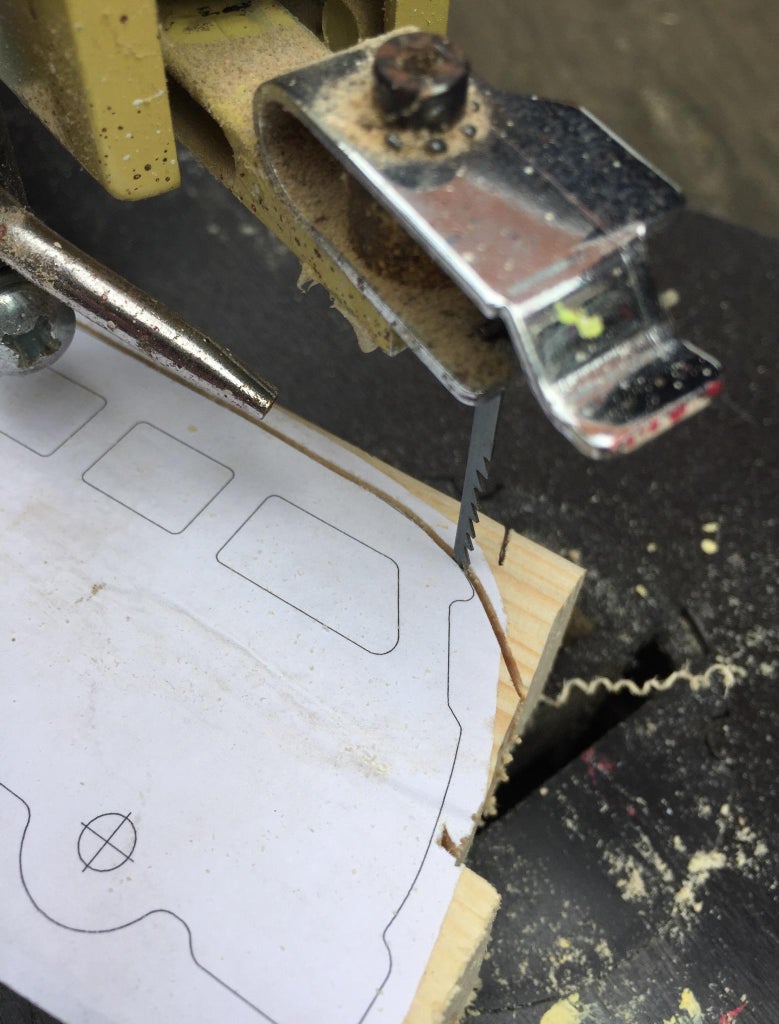
To do the windows of the cars I drilled through the centre with a drill bit that was slightly larger than the saw blade. The threaded it through the hole and reinstalled it in the scroll saw and cut the windows out, repeating this for each window. 

https://content.instructables.com/ORIG/F8G/RLC1/KO76NT4Y/F8GRLC1KO76NT4Y.jpg?auto=webp&frame=1&width=1024&height=1024&fit=bounds&md=ea3c0be63295136a00bfe1b01bb5c0ae https://content.instructables.com/ORIG/F5O/Z8SU/KO76NT69/F5OZ8SUKO76NT69.jpg?auto=webp&frame=1&width=1024&height=1024&fit=bounds&md=16be1da4d2559e8d0e7d834d7da62e42

When the design was cut out I used a drill bit the size of my axles (we will get into that later) to drill a hole all the way through the cars. 


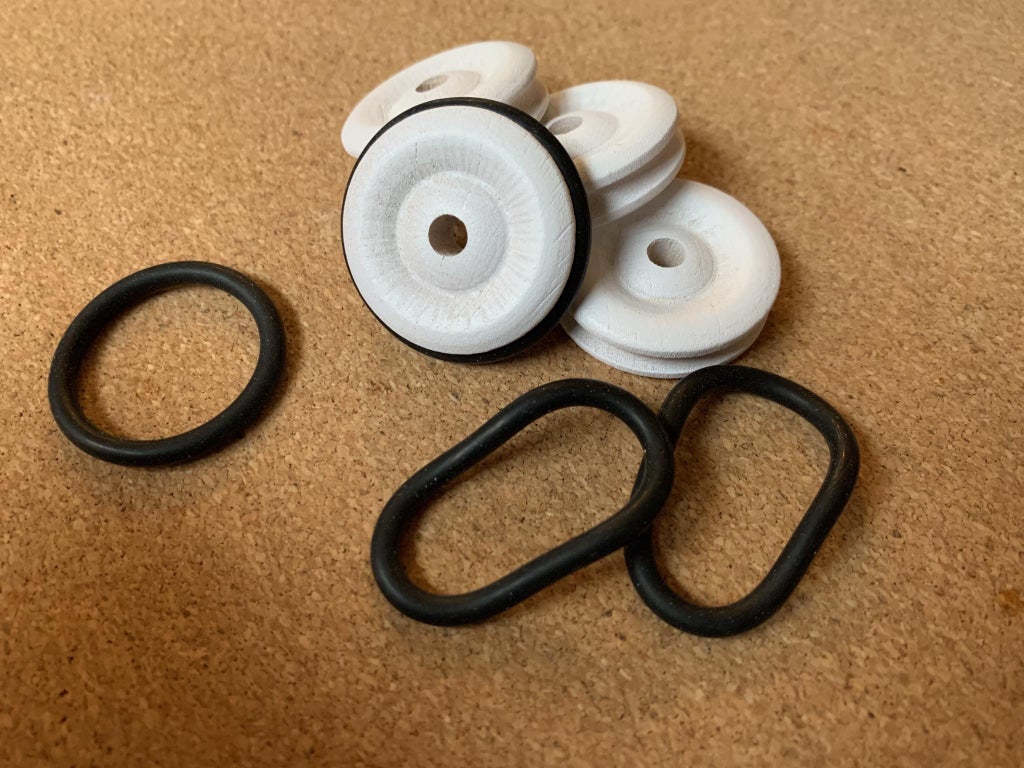
I found these nice wheels online that have a lovely rubber O ring as a tyre and I really liked the look. 

https://content.instructables.com/ORIG/FJN/5P4M/KO76NT0X/FJN5P4MKO76NT0X.jpg?auto=webp&frame=1&width=1024&height=1024&fit=bounds&md=eb8345fbf78b797a4efa52d63b79d4cc

The hole in each wheel was slightly too small for my axel so I drilled them out slightly to fit. 

After drilling all the holes I painted all the wheels white to give them a little bit of a whitewall tyre vibe. I took the O rings off before painting. 

https://content.instructables.com/ORIG/FT9/GI5D/KO76NT1Y/FT9GI5DKO76NT1Y.jpg?auto=webp&frame=1&width=1024&height=1024&fit=bounds&md=007a8046ecb68c74112481bfbbd210de

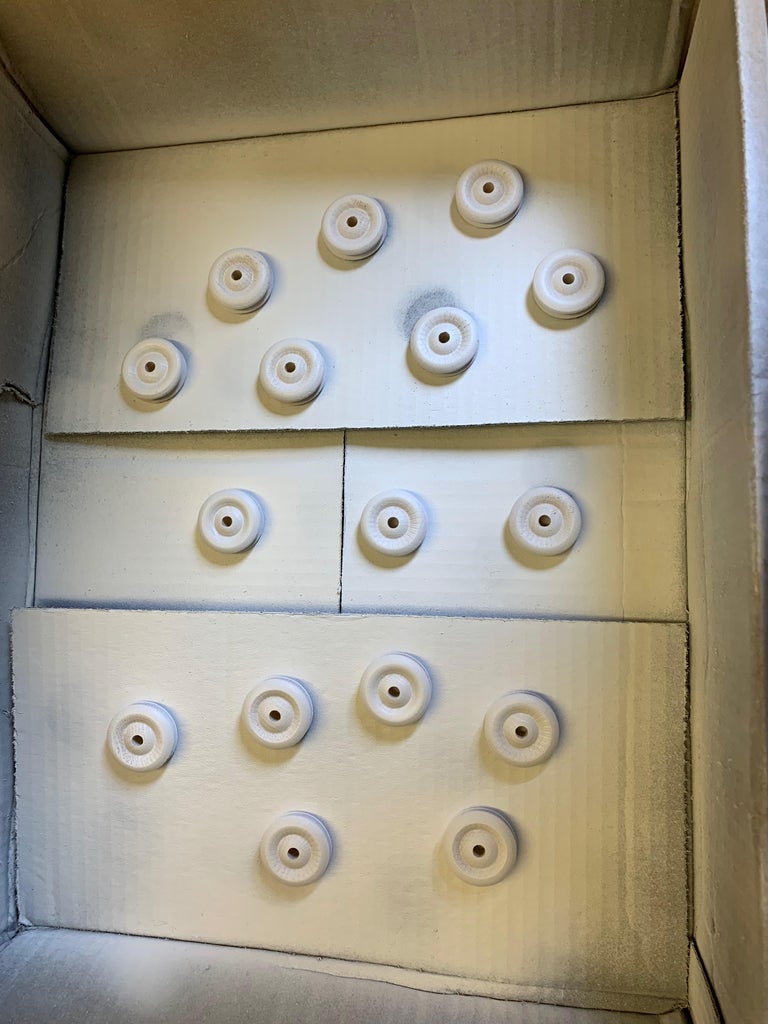
I think they look really great after painting. 

https://content.instructables.com/ORIG/F3H/H3TU/KO76NT3H/F3HH3TUKO76NT3H.jpg?auto=webp&frame=1&width=1024&height=1024&fit=bounds&md=a7ddc459bb4f8710e0137198f53489a5


The cut cars had sharp corners/edges so I went about sanding all of them to clean up the cut edge and the corners. 

Using a flapper sanding bit in my drill I took the sharp corners off all the outer edges of the cars. I used a smaller flapper sanding bit in a rotary tool to do the inner sections, windows, and tight corners. Then I used some sand paper to make all the flat surfaces clean and free from any cutter marks or splinters.  

https://content.instructables.com/ORIG/FXV/Y8V0/KO76NT9I/FXVY8V0KO76NT9I.jpg?auto=webp&frame=1&width=1024&height=1024&fit=bounds&md=818b7cb39c821ba4d08293be56a7ed41  https://content.instructables.com/ORIG/FP7/J41P/KO76NUGR/FP7J41PKO76NUGR.jpg?auto=webp&frame=1&width=1024&fit=bounds&md=02f508f10a1fc5b499f21c23d89013d4


The axels for the wooden cars are binding posts or Chicago screws. I got some that were long enough to go through 2 wheels 2 washers and the body of the car.

https://content.instructables.com/ORIG/FEL/MIN3/KO76NTW9/FELMIN3KO76NTW9.jpg?auto=webp&frame=1&width=1024&height=1024&fit=bounds&md=5c6c4ecf8a58d9acfde5300a23142f07

The posts unscrew on one end, so I placed a wheel then a nylon washer on the long post, then put that through the car. A nylon washer and the second wheel then when screwing in the other end of the post I added some super glue to make sure they won't come undone. 

https://content.instructables.com/ORIG/FFX/FGWN/KO76NU53/FFXFGWNKO76NU53.jpg?auto=webp&frame=1&width=1024&fit=bounds&md=ca843d7b728957bce4a859df5ef2c8d2


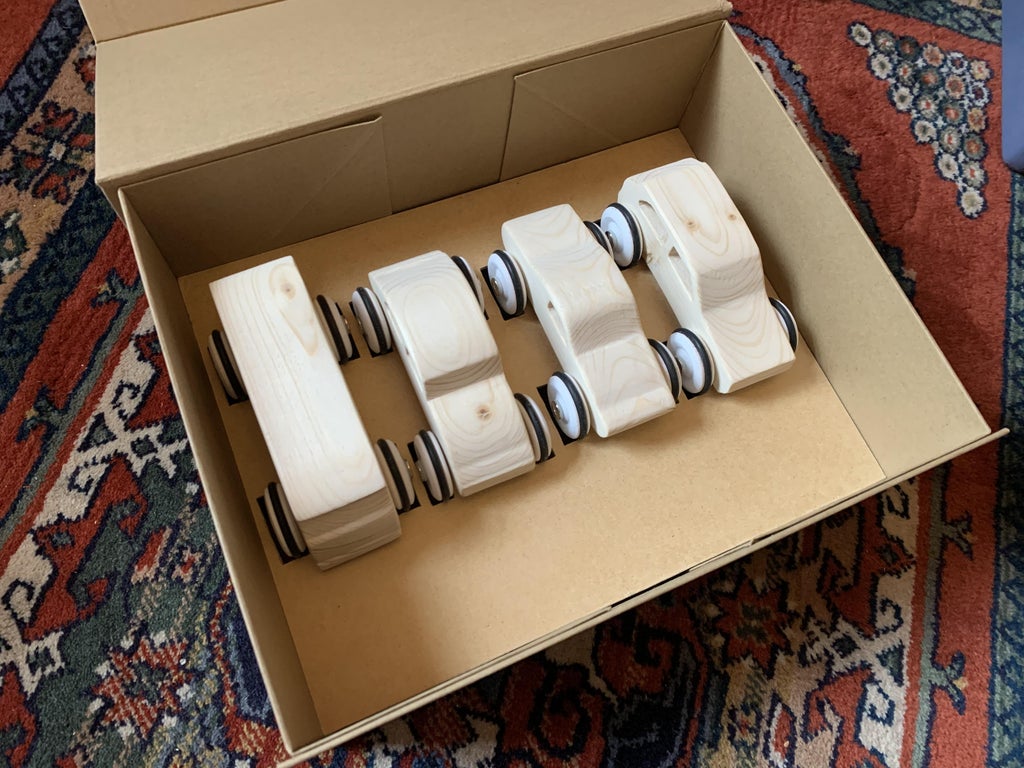
The wheels look great on the finished cars. 

https://content.instructables.com/ORIG/FQE/K65U/KO76NTBI/FQEK65UKO76NTBI.jpg?auto=webp&frame=1&width=1024&height=1024&fit=bounds&md=d655635ceb4f62be335424aaa822c906


I could have finished there. But as these were going to be a gift for my son I wanted to make a box. 

I found a nice card box with a flap lid online. 

I placed a false floor of thin hardboard with some wheel holes cut into it, these were cut using the scroll saw, they were big enough to allow the cars wheels to drop into them and have the cars sit on the axles so they didn't roll around in the box. 

https://content.instructables.com/ORIG/F7H/7A5H/KOR6TJ2O/F7H7A5HKOR6TJ2O.jpg?auto=webp&frame=1&width=1024&height=1024&fit=bounds&md=64f8e52018ec16f07792bb78b54da740


I used a vinyl cutter to make a little graphic for the front of the box, along with my sons name (which I have censored)

https://content.instructables.com/ORIG/F3F/CYL3/KPCMFP2B/F3FCYL3KPCMFP2B.jpg?auto=webp&frame=1&width=1024&height=1024&fit=bounds&md=79b67f6b4f269889d20aad64093ac16c https://content.instructables.com/ORIG/FGC/A3G0/KPCMFP5D/FGCA3G0KPCMFP5D.jpg?auto=webp&frame=1&width=1024&height=1024&fit=bounds&md=0041faade9c6aa609a7bc1b652efda18

I stuck this to the top of the box. 

https://content.instructables.com/ORIG/FGO/PK0S/KOZRGQWY/FGOPK0SKOZRGQWY.jpg?auto=webp&frame=1&width=1024&height=1024&fit=bounds&md=eda9511bcde51000ede1905be4a56be2 https://content.instructables.com/ORIG/FYW/SCAI/KQ57ACQB/FYWSCAIKQ57ACQB.jpg?auto=webp&frame=1&width=1024&height=1024&fit=bounds&md=576876e1a4a11f5b94927028380de79f

I also made a little pull here label and a VW logo, just for a bit of fun.  

https://content.instructables.com/ORIG/FWC/92BX/KOZRGR4N/FWC92BXKOZRGR4N.jpg?auto=webp&frame=1&width=1024&height=1024&fit=bounds&md=2824024b68fc43aca3750d26a19ce222

The four car models I went for are.

https://content.instructables.com/ORIG/FUL/H3K8/KOU1PNNW/FULH3K8KOU1PNNW.jpg?auto=webp&frame=1&width=1024&height=1024&fit=bounds&md=fc8470af09acd0f4677574e8c4b58bachttps://content.instructables.com/ORIG/F5O/D9I8/KOU1PNQA/F5OD9I8KOU1PNQA.jpg?auto=webp&frame=1&width=1024&height=1024&fit=bounds&md=b0d0106a7593844429c9687c281091f8

The Karmann Ghia.                      The Beetle.

https://content.instructables.com/ORIG/F42/88GJ/KOU1PNLI/F4288GJKOU1PNLI.jpg?auto=webp&frame=1&width=1024&height=1024&fit=bounds&md=efefac124aaeeaf068d7366ea43a0a12https://content.instructables.com/ORIG/FUY/3KAH/KOU1PNJ5/FUY3KAHKOU1PNJ5.jpg?auto=webp&frame=1&width=1024&height=1024&fit=bounds&md=3a3000df0ab584e5da1b7c9c1574ee32

             The MK2 Golf.              The Split Screen Camper van.


Thank you for looking. 

If you have any questions please leave a comment and i will do my best to answer any questions. 


Also if you like this build please share it, it means alot to see people sharing my work.